Sunday 24 February 2013

Nail Art: Paws for thought....

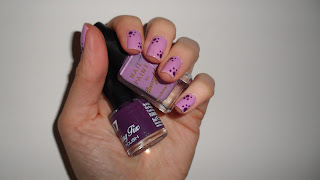
For the next couple of weeks, I shall be dog sitting as my parents are off on their holidays (luckily things!) So I came up with a design inspired by my four-legged friend.


Let me introduce her. This little pampered pooch is called Tiffany, she was named after my favourite Jewellery shop at the time Tiffany & Co and as a puppy she actually use to wear my Tiffany & Co bracelet as a dog collar, unfortunately it no longer fits. She is a Chihuahua by name, but not by nature. She’s not yappy, and she thinks she’s a BIG dog. To quote the movie Beverly Hills Chihuahua, she’s “tiny, but mighty!” She recently celebrated her 6th birthday (in dog years that’s like 42!) on the 15th January 2013. She is adorable and has such a nice nature and loves to be cuddled and stroked. She definitely has no trouble in letting you know she wants a belly rub!
 
I opted to use a pastel colour for the main shade for this design, which I was recently inspired by London Fashion Week, and the fact that although quite chilly, the sun has been out sporadically this week. For the design, I used a deeper shade of the same tone, as I thought it would compliment them nicely.
Nail polishes used:
 
 
Base colour: Barry M - Berry Lilac
Design Colour: 17 - Royal Indigo
Top Coat: OPI Top Coat

I used one coat for the base, as the polish by Barry M (not for all shades though) seems to be thick enough to make it opaque by just using one coat. I waited for approx. 10 minutes to let them dry. Using two different sized dotting tools, one big one small to design the paws.
 
I placed the paws diagonally opposite each other, which kept the design fun, paw-like, but not too overbearing. Obviously you can have as many or as little as you like. Using the dotting tools makes this design super easy.
So there you have it, fun nails that look woof-derful!
 
 
What animal associated nails would you like to see next?
Have you ever had animal inspired nails?
Until next time…
Laura-Jane

Thursday 21 February 2013

Foil nail art.

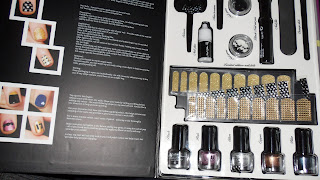
For Christmas, I received nail art supplies in abundance. One present from my Mummy was a nail box by 17 equipped with polish, files, scissors, gems, orange sticks and nail foils. I have only ever had foils on my fingernails on one occasion; where I spent a ridiculous amount of money having the silver chrome Minx foils applied for my Aunts 50th birthday, where we spent the weekend in Rome. Blingtastic, yes. Were they worth the money? Absolutely not! Did I like them? Yes, in a way. I liked the look, the random compliments from passengers on my daily commute, and on my travels in Rome, but I was disappointed in the way they were applied, by an apparent 'professional'. The overall finish left my nails with bumpy ridges, and it just looked like a rush job, even though I was sitting there for well over ninety minutes.


I did vow never to get them done again, not at the salon I went to anyway. However, that all changed when I opened the nail box on Christmas day. Part of me wishes I had waited for a special occasion, and used them for a night out or for a real reason to get glammed up. However, the impatient child within me decided to just give them a go, as I was bored at the weekend whilst the boyfriend was working (the joy of being a sports betting trader's girlfriend.) The nail box contained three different designs; a glitter gold, a shiny/matte gold and the black and silver star design, which is the one that I opted for.


First, you need to make sure all nail polish has been removed, and there is no natural oils on the nail before application. This will just make the foils slide right off the nail, and won't last at all. I used the buffer cube, the one where you use different side of the file to remove ridges, flatten the surface add a shine etc. I then filed and shaped the nail to my desired shape. I always opt for a square finish; this is just my personal preference, as I have quite long fingers and I feel it just adds a nice shape to the hand. I also think it looks more elegant, but each to their own.

It is also best to trim the foils too before application; just so you don't have too much overlay to work with. Peal the foils off the plastic backing and place over the nail. I rubbed over the nail for approx 2 minutes with my fingers. I did this to warm up the adhesive to make it stick. This also helps to get a smooth finish and clean any bubbles that may have occurred. The instruction in the box (and also at salons that provide Minx) advise you to file off the excess foil until it is the same size as the natural nail. From my previous experience with foils, I opted not to do this. I didn't want a rough finish which can often happen when using a nail file, so I used very small nail scissors to trim the foil to get a nice neat finish along the tip of my natural nail. As I have square nails, this was very easy to do, as it was basically cutting in a straight line. I can envisage a nail file may be the best option for almond or round shaped nails.

I did one nail at a time; as there is no nail polish, you don't need to worry about smudges or mishaps with wet nails. Once I had completed all ten fingers, I then used a hair dryer on a high heat setting to blast the foils to again heat up the glue. This makes the foils extremely warm (please be careful when using your hair dryer, as your fingers can get extremely hot!) This also gives you a good opportunity to stretch the foils to completely cover the nail if they are not the right size for your fingernails. In my case, they seem to fit my nails perfectly. They were like they were custom made for my fingers.

Overall, I was very pleased with the finish, and teamed up with a glam outfit, these foil designs would really complete a going-out look. I can safely say I have done a complete U-turn on my stance on foils, and maybe doing a DIY job is the way to go for me. I shall definitely be applying the other set of foils in the not so distance future, but I shall be saving them for a special occasion.
 

They didn't last too long on the nails though, which is disappointing. This may be my own fault, with my almost OCD compulsion to have everything clean, so I am always washing my hands and/or having showers, but they lasted approx two days before they started to peel at the edges. Minx on the other hand, did last for around five days before this happened, so maybe it is a design flaw by the makers of 17. However I must say these foils are easy to apply and look great for a one-off night and I think anyone who loves to have fashion at and on their finger tips must give them a go at least once.

Let me know your experience of using foils, and if you have used a different brand of foils, post in the comments box, I'd love to give them a try.

Until next time...

Laura-Jane

Friday 15 February 2013

Diamonds are a girl's best friend...

The sun has been shining in London today, and it is the first warm(ish) day I can remember in a long time; hence the new coral coloured nails; which is perfect for spring. I like to call this design a French manicure with a modern twist, with a bit of sparkle to finish it off.


Nail polishes used:


Peach Melba (381) by Barry M
Coral (415) by Rimmel London
Kiss Nail Art Paint in White
Albert Bridge top coat by Nails Inc

How to get the look:

I used one coat of the Peach Melba by Barry M, which I then let dry. I like to paint all ten fingernails, and by this time I find the first nail I painted is dry enough to do the next step. I then used the Rimmel London Coral polish to add the tip, using a very thin coat. To separate the two colours, I swiped across the fingernail with the white Kiss nail art paint (I was planning on using a glittery gold, but I didn't have any in my collection). To add the piece de resistance, I used an orange stick to place a small rhinestone in the middle of the white strip. The rhinestones used were by a company called 'Cheeky'.


I didn't use any glue, just placed it on wet nail varnish and completed the look with one coat of Albert Bridge Top Coat by Nails Inc to seal it together and get that lasting shine. There you have it, very simple to do, but looks rather elegant and a sure way for compliments to come flooding in. The rhinestones make it that extra special, and after all, diamonds really are a girl's best friend!


Who's going to give it a go? Let me know what you think, and if you give it a try, make sure you leave a link in the comment box below.

Until next time...

Laura-Jane

Sunday 10 February 2013

Valentine's Day nail art...

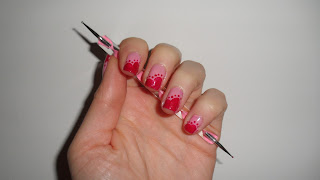
My first nail art post is going to be dedicated to lurrrve. First and foremost, my love of nail polish, nail art, and having those fingertips looking immaculate. Secondary of course is Valentine's Day, which is just around the corner.

I am not much of a fan of Valentine's Day, mainly because my boyfriend isn't either, but I personally think it is rather commercial, extremely over hyped and not to mention expensive (I know, not the usual response of a girl!). However, I have got into the spirit of the holiday this year, and have done a cute manicure that would do Cupid proud.

Here goes:


Nail polish used:

Nails Inc - Warwick Avenue
OPI - Miniature red with glitter, no name on bottle.
Nails Inc - Albert Bridge (top coat)

 
I used two thin coats of Warwick Avenue, and freestyled the heart shapes with the red OPI polish. Don't get me wrong, a steady hand is required, but it's pretty simple to do. To finish off the design I used a dotting tool (the smallest one I had) to frame the heart shape.


I let it all dry and completed the manicure with one coat of the Nails Inc Albert Bridge top coat, and hey presto, you have beautiful Valentine's Day nails that everyone (even the most cynical) will love.

Would love to hear what you all think of the design, and if you give it a go or come up with your own designs, then I would love to see them too...

Until next time,

Laura-Jane

A little introduction:

Welcome to my blog. I know it’s not the most original way to start a blog and has been done millions of times before, but hey that’s how it’s going to go.
 
A little bit about me…
 
I’m a twenty-something born and bred Londoner, my name is Laura-Jane and I’m a blogging novice. That definitely has an Alcoholic Anonymous-like ring to it, oops! Not really my intention or the look I was hoping to achieve…
 
I have a passion for sports (this is my vocational course in life), but also the dainty girly things that preoccupies the mind when often daydreaming. Working in a male dominant environment, sometimes you've just got to think ‘GIRL!’. I have always been creative, ever since a young age, I would always look forward to birthdays and Christmases to open up DIY craft sets and sit for hours upon end creating something beautiful (not always the case) to keep myself or give away as a gift to relatives. As I’ve gotten older, I have grown out of a lot of it, and to be honest, my academic career and now having a full-time job doesn’t leave much time. However, there is one thing that has stayed with me; nail art. There is something about creating art on the canvas of your own fingertips that’s very therapeutic, relaxing, and I’m not going to blow my own trumpet, but very rewarding when all the compliments come in, and the astonishment on people’s faces when they ask where I got my nails done, and I can reply with great satisfaction (and the big grin plastered across my face) that I did them myself!
 
I have started this blog in homage to my hobby, and I hope that any readers/followers I may obtain, will enjoy reading what I have written (another creative flair I have a passion for, Carrie Bradshaw eat your heart out), and possibly give some of my work, tip and tricks a go.
 
I would love to hear what you think, any opinions you have or just some ideas you are willing to share. I’m sure all you guys’n’dolls know exactly what to do and just post a comment in the comment box, or if you would prefer you can email me at laurajaneconnolly@googlemail.com.
 
So the gloves are off and the claws are out, let’s get those polishes, pens and talons out and get this show on the road…
 
Until next time…
 
Laura-Jane