Thursday 28 March 2013

Easter Inspired Nail Art

I am sure most of your are looking forward to a nice long weekend, spending time with family and friends and munching on tons of chocolate. Well, that's what most people here in the UK tend to do. However, Easter is not just about the Easter Bunny, egg hunts and chocolate, it also has an important religious significance too, which you can read about here.

I have gone down the less traditional Catholic route to display my Easter festivities on my finger tips, and have gone for a multi-coloured, more modern take on Easter...


This has probably been the most adventurous nail art I have attempted, and without blowing my own trumpet, I think they have come off rather nicely. It took forever to do, and with a lot of patience, a steady hand, and a multitude of polishes and tools, I finally got there.

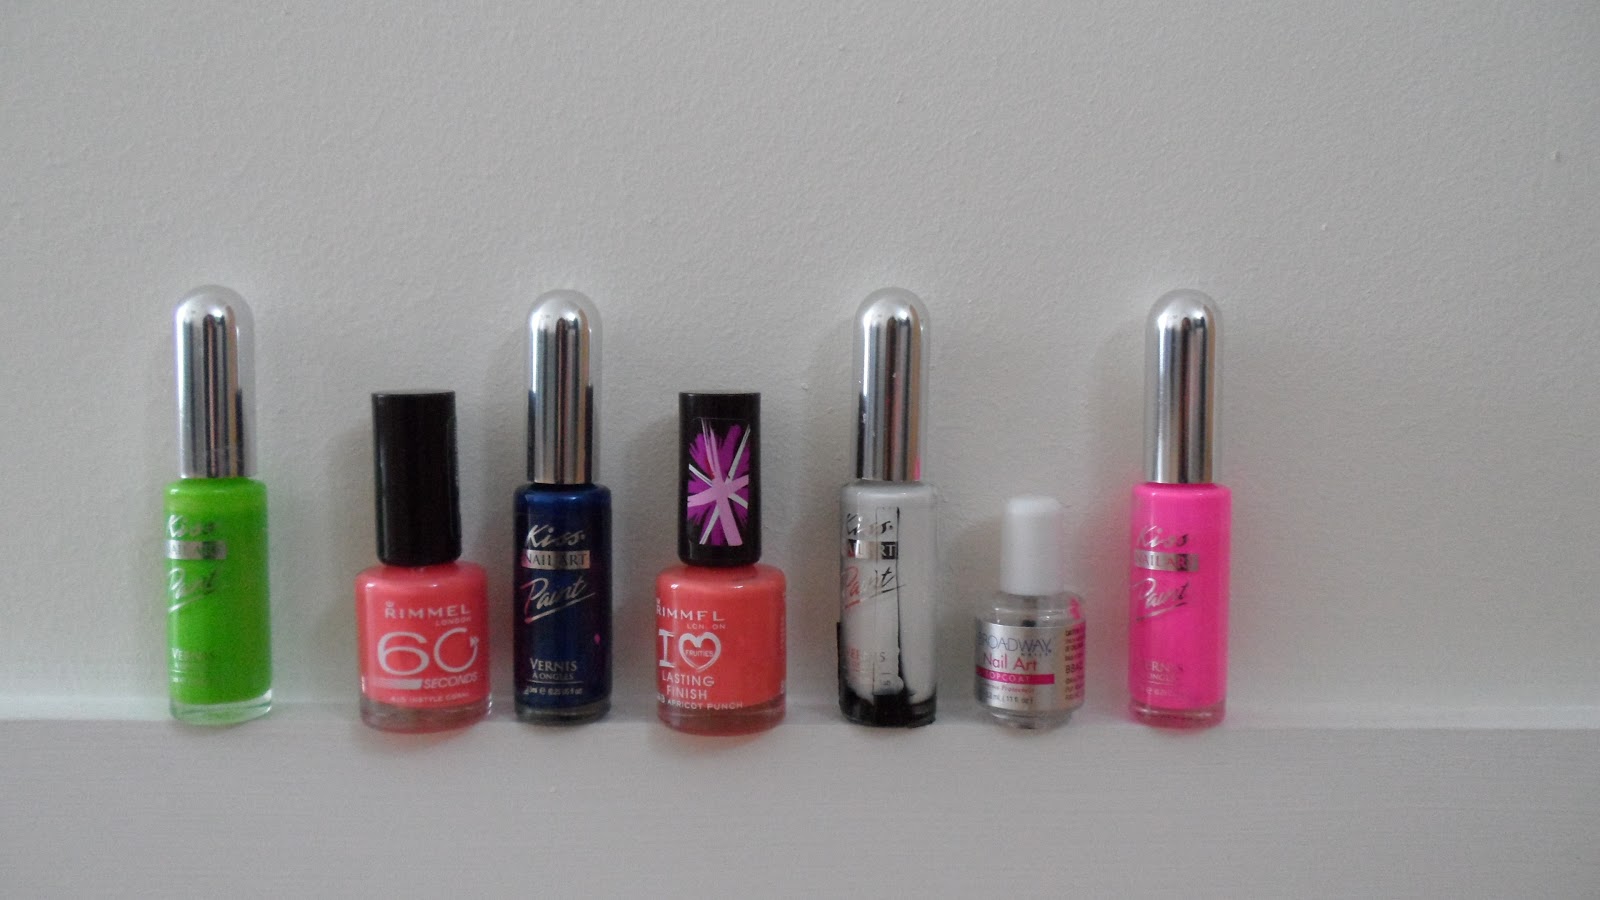
Here is what I used:


From left to right:

Black Taxi by Nails Inc
Pink by Nails Supreme
Silver glitter nail paint by Kiss
Blue nail paint by Kiss
Royal Indigo by 17
Strawberry by Barry M
Berry by Barry M
Matte White by Barry M
Lemon by Barry M
Sweet As Sugar by Rimmel London
 
Green nail paint by Kiss
Pink nail paint by Kiss
Miami by 17

The tools used:


I used dotting tools to apply the more intricate designs like the egg detail, eyes, small flicks. I used the paint brushes for the bigger designs such as the egg, Easter bunny and butterfly.

Let me introduce you to my little friends:

The pinky: A little Easter chick complete with bright orange beak and fluffy hair.


The ring finger: A speckled Easter egg just like the yummy little treats you get in packets of Cadbury's Mini Eggs. This nail art resembled an Easter egg hunt, and used grass detail to create this effect.


The middle finger: This one was probably the hardest to do, and as you can see is the character most associated with Easter now; the Easter Bunny.


The index finger: I gained inspiration for this one from my childhood, where every Easter at Primary School we had a competition to decorate your own egg with paints, glitter, sequins or any other crafts you could find. This was just a nail to have fun with, with dots, lines, zigzags, and just to add a bit of creativity.


The Thumb: This nail is not necessarily Easter related; more for the time of year. The butterfly resembles Spring, new life and growth. The silver body and antennas add a bit of sparkle to the design.


I don't tend to do different nail designs on each finger, I much prefer a more uniformed look, although I can sometimes be partial to the accent nail on the ring finger. However these designs have changed my opinion, as I do really like the look of them. They have received lots of compliments too, from both adults and children. I even got a comment today, saying "they were like little bits of art on your fingers", which of course I love to hear as I did put so much effort into creating them.

I think the colours together all tie in together and complement each other too.


To top off all the designs, I finally got to use my newly purchased bottle of Seche Vite fast drying top coat. I was super excited to use it when I purchased it, and I have to say it did not disappoint. I am going to put myself out there and keep with the religious theme and say it is the Holy Grail of top coats. This stuff is a-maz-ing! If you do not have a bottle, I suggest you pick yourself up some. I bought mine from Boots for £9.00, but I know you can get it cheaper on Amazon if you don't mind waiting the posting time.

Which one is your favourite?
Do you have any Easter nail art designs you want to share?

Until next time...

Laura-Jane

Sunday 24 March 2013

Floral Nail Art

It is officially Spring, however I have woken up to a panoramic view from my apartment of Central London that has had quite the dusting of snow. I have however attempted another Springtime nail art design, in the hope that the more I do, the more chance there is of waking up to sunshine and warmth. I know its unrealistic, but a girl can't help but try!


I gained inspiration from a dressing gown I own, which I am actually wrapped up in now as I write this blog post. It was bought for me as a present by the boyfriend before we moved in together last year. I have to say it is the best dressing gown in the world; long, fluffy, cosy and even has a hood, which is perfect for cold cosy nights in watching a movie on the couch. The colours are vibrant and bright, and you can't help but feel in a happy mood when wearing it, especially in the winter as I tend to wear quite dark colours, so it makes a change for me to wear such bold ones.

The said dressing gown:


I obviously didn't copy the design of the bathrobe exactly, but I created my own adaptation using the colours and floral print for inspiration. I have been wearing them for a few days now, and I have had quite a few compliments; I even got the seal of approval from the boyfriend.

Nail polishes used:

Base colour: fuchsia pink by Nails Supreme
Petal colour: light pink by Nails Supreme
Centre of flower colour: 'Poppies in the snow' by Revlon UK
Leaf colour: Green by Nails Supreme
Top coat: top coat by MUA.


To create the flowers I used a large dotting tool. I used the same size tool to create the middle of the flower and the petals. I used approx. five petals per flower. I then used a smaller dotting tool to create a little flick of green for the leaves, which I think finishes off the design perfectly. It adds another colour and therefore another dimension to the design. Don't forget to add a top coat to make your manicure last and also give it that extra bit of shine.


This is a really easy design to do, yet it's bright and stands out and will get everyone noticing your nails.

Let me know what you think?
Are you going to give it a try?

Until next time...

Laura-Jane

Saturday 16 March 2013

St Patrick's Day Nail Art

Tomorrow marks the day of all things green, little leprechauns, and tacky shamrock laden memorabilia. Yes, it's St Patrick's Day, the patron Saint of Ireland. A day which is notorious for Paddies across the globe to break Lent and allow themselves a little tipple of the black stuff - Guinness. I'm joining in by marking the day with my special St Patrick's Day nail art. A white wine spritzer is more my poison of choice.


My nail polish collection doesn't consist of many green polishes. I am not an avid fan of the colour, and just tend to use them for minimal detail for leaves in some flower designs. I did however buy into the hype of mint green nails a few seasons ago and made a purchase at the Revlon counter called 'Minted', which is a very Tiffany & Co-esque in colour, which I actually don't mind. I used this said polish for my base coat.


I tipped the nails with MUA's 'All Nude' polish, which is an off white colour, just so the green wasn't too overbearing. I allowed this to dry completely before beginning to start my shamrock detail.

To create the shamrocks, I used a large dotting tool to create the main body of the detail, placing three large dots together in a triangular shape; I then used a smaller dotting tool to flick the green out to create the stem.


To finish off the manicure, I separated the green and white main colours with a silver glittery stripe to add a touch of sparkle and to complete the look I had in mind. For this I used a silver nail art paint by a company called 'Kiss' which I bought from Superdrug. I really recommend their nail art paints, as they come with a very thin application brush, which makes nail art a doddle. I would have liked to have used a gold glitter to resemble the pot of gold at the end of a rainbow, but a gold glitter is absent from my collection :(.


Allow all to dry and apply a top coat. I used MUA's top coat, as that's all I have at the moment; I am still waiting to purchase the fast drying top coat from Seche Vite. I am not overly impressed with this top coat, so wouldn't really recommend, but for £1 it does the job. I have to say I have used better top coats by OPI and Nails Inc, which are more expensive, obviously. I guess like the old saying goes, you get what you pay for.

Are you doing anything special for St Patrick's Day?

To those who are celebrating (I'm sure my family on the west coast of Ireland in County Mayo shall be) and those who will be plastic paddy's for the day, I hope you have a great day and have a pint of Guinness for me.

Until next time...

Laura-Jane

Tuesday 12 March 2013

Ladybug Nail art

Like most Londoner's, I was fooled last week into thinking Spring was here. How wrong was I? This week has seen the coldest March for 27 years with flurries of snow to top off the icy wind (I work outside, so I really am not liking this change in climate. For me it has been a VERY loooooooong Winter.) I'm an optimistic type of girl, and I am sure that Spring really is just around the corner, so decided to create a Springtime piece of nail art to share with you all. Other than flowers, butterflies, and the sun, which to me resembles Spring, another creature which I find synonymous to this time of year are ladybugs.
 
 
This is a very time consuming manicure (at least 1.5 hours) using a numerous amount of polishes and tools and it is definitely not for the faint hearted. There is also a lot of drying time involved, hence the lengthy time frame. It took me three attempts at this manicure to get it right. I managed to smudge it the first time using the top coat, where all the colours ran into each other - very disheartening. I ended up with dents and a squashed design on some of my nails as I decided to cook dinner too soon after painting my nails on the second - which caused my heart to sink even further. On the third attempt, I learnt that patience really is a virtue and literally did not move for hours afterwards - success, yay!

Nail polishes used:
 
 
Base colour – ‘London’ by Nails Inc.
Base Colour for ring finger and ladybug bodies – ‘Cherries in the snow’ by Revlon.
Black dots and heads of ladybugs – ‘Black Taxi’ by Nail Inc.
The eyes – ‘Pearl White’ by MUA.
Top Coat – ‘Top Coat' by MUA.
 
I first painted all nails with my base coats, including the two accent nails and waited for them to become touch dry before I moved onto painting the ladybugs. To create the ladybugs I used three different size dotting tools; a large one for the body, a medium sized one for the head and a small one to create the spots and eyes. You can pick up dotting tools at a reasonable price from eBay and Amazon; they always seem to be in stock. I'm not too sure where my ones are from, as I got them as a little stocking filler gift from Santa. I like to have the ladybugs facing all different directions, to me it makes them appear they are scattering all over the place. You can have them in a more uniformed fashion if you prefer. Wait for all to dry completely before applying your top coat. You could probably speed up the process by applying a fast drying top coat such as Seche Vite, which I am yet to purchase and try out. However I have heard lots of very good things about it, and is currently on my wish list and top priority when I next go on a nail shopping haul.
 
 
I used the ring finger for the accent nail, creating a large ladybug. I didn’t want the manicure to be too overbearing, so opted for an accent nail and to have small lady bugs on the remaining nails, which are the ones I actually prefer. I think they look cute.

So there you have it, ladybug nails in time for Spring, whenever it decides to come…
 
 
What do you think?
 
Until next time…
 
Laura-Jane x

Thursday 7 March 2013

Mother's Day Nail Art; because every Mother deserves flowers...

In the UK it is Mothering Sunday this weekend (I hope you have all planned something special!?) I don’t think there is a more perfect way to spoil your Mum and tell her how much you love her than a good old pampering session. So, instead of the usual box of chocolates or bunch of flowers, why not treat your Mum to a beautiful Mother’s Day inspired manicure…

 
To make it really special, you can go all out, pull out all the stops and give her a manicure experience to remember. First of all, set the ambiance and play some soothing background music, or something that you both like to listen to. Bathe hands in a homemade soak. This is basically a bowl of warm water that is filled deep enough to cover both hands once they have been submerged. You can add moisturising body wash to the mix, or can just add some scented oils to fill the room with a beautiful aroma, and to also soften the hands. Lavender is a good shout, which boasts lots of relaxation properties. Soak for around 10 minutes. Next up is a relaxing massage, place a large dollop of water based hand cream or moisturising oil (a thick hand cream will not work) and gently massage the hands up the forearm to the elbow, making sure you use circular motions and you don’t miss a spot, even get in between the fingers (I should also point out, that the removal of rings would be a good idea – should have actually mentioned that at the beginning, better late than never, eh?) A good hand massage should last around 10 minutes, longer if you want, I’m sure your Mum wouldn’t say no!
 
 
Once this has been done, the hands need to prepped and ready to paint; File nails to the desired shape and length, cleaned under the nail and also by wiping the nails with a cotton swab to rid it off any cream and natural oils, and a base coat (optional) is applied.
 
 
Nail polishes used:
 
 
Choose your base colour, I have gone for one coat of 'Apricot Punch' and one coat of 'Instyle Coral' both by Rimmel London. When applied together, they mix well to create a nice peachy coral colour. I like to use nail polish brands that just allow me to apply one coat of polish, two if required, but that is my maximum. Once dry, tip the nail with the white polish. I used white nail art polish by 'Kiss', which has a very thin application brush. Let this dry.
 
 
Now comes the fun part. Pick two complimentary colours to use for your flowers; one for the petals, and the other for the centre. For this design, I have chosen the pink and blue nail art polish by 'Kiss'. Paint four to five petals (I always do all the petals first on all fingers, so I don’t have to change the polish) and then place a dot in the centre to complete your flower. To finish it off, add a touch of green to resemble leaves and/or a steam. Always add a top coat of clear polish to seal in your art work and give it that extra sparkle. This also makes the whole manicure come together and somehow blends the polishes to make it look complete.
 
 
There you go, a beautiful manicure and one very happy Mummy! Or if you have done it for yourself, a very happy YOU!
 
 
What are you going to do for your Mum this Mother’s Day?
 
 
Let me know what you think of the design, and if you shall be giving it a go.
 
 
Until next time… 
 
 
Laura-Jane

Sunday 3 March 2013

Nail Polish: Battle of the brands...


Rather than a nail art or nail design post, this post is more of a behind the scenes editorial (and a bit of a long one, sorry.) Every beauty buyer and blogger has their own opinion when it comes to their favourite piece of make-up stash. My question I put to you all is; How do you identify a good nail polish brand?
 
For me, a good nail polish brand has to have a nice consistency – smooth, creamy, pigmented etc. Is opaque after applying one coat (two maximum) and also lasts the length of time, by this I mean does not turn gloppy or starts to thicken after a few months and also lasts on the nails after a time consuming manicure. I expect a manicure to last without chipping and peeling for at least five days. After all a nail polish should be for life (or until you have an empty bottle) not just for Christmas.
 
I have experimented with a few different brands of nail polish. I have by no means tried and tested them all, but I have drawn up a list of the ones I have put to the test and some that I shall firmly place on my wish list.
 
I would have to say hands down that this brand is my favourite brand of nail polish. I like their consistency, and I only ever have to apply one coat, which in my opinion is a bonus. It means less waiting around time for polish to dry and you get to do more of the fun stuff like nail art designs and making them look pretty. The smoothness and texture are a 10/10 for me too. I don’t however like their price tag. At £10.50 minimum for a bottle it is a little on the steep side, but the bottle design has a nice look to it, and I guess you are buying into the brand name. However you can forgo the RRP, as I have recently found out that the shopping channel QVC often do deals on Nails Inc. products, and you can pick up sets for a bargain! There are also eBay and amazon where you can pick up a bargain too, although I am sure you all knew that anyway!? I am finding it really hard to get my manicured paws on their matte black polish called 'Oxford Street'. Every time I try to make the purchase, they're sold out. GRRRRRRRR!
 
Okay, so I may get a little stick for this, as I know this brand of nail polish is favoured by many beauty bloggers across the globe. However I have bought a numerous amount of polishes from them, and I have found some (not every) polish to be rather watery. They are definitely not my go-to brand for polish. They are great for water marbling, so are great for that nail art effect. For an every day nail job, and intricate designs theses are a no-no, for me anyway. On a positive note I have to say I do like the application handle on the packaging, which is rather long in comparison to other brands out there, which allows you to maintain a good grip thus a steady hand when applying. I do have one confession regarding OPI nail polishes; my favourite thing about OPI are the names they give individual products. They never fail when it comes to giving them a catchy moniker, some often make me giggle, and I do love a good nail polish name. Sometimes this can be the deciding factor upon purchase. My favourite at the moment, has to be "Kiss me on the Tulips." It has a nice romantic ring to it. Another named favourite has to be "No more waity Kaity" a cobalt blue polish, which was named after Kate Middleton's marriage to Prince William. Not only am I fan of the Royal Family, and the Duke and Duchess. I really like the purply-blue colour, which for me is rather regal and an apt named polish.
 
Now I do like Barry M. They are easily available at Superdrug and some department stores here in the UK, and at £3 a pop, they are not too hard to resist. They do offer a vast range of colours, and are great for releasing on trend colours and mimicking and duping (in some cases rather closely) the likes of Chanel at a more affordable price. However some polishes can be a bit hit-and miss, some are lacking in smoothness and pigmentation which doesn’t always make application that easy even for the most experiences nail polish addicts. So over all, if you get a good polish and not one that is lacklustre and not a dud, you’re laughing!
 
Although the nail polish colours are rather limited, and those that are more adventurous are not really my style, these are okay polishes. Some colours you need to apply two coats, but the polishes that I have purchased seem to work well for me. One great thing about the 17 nail polishes are the application brushes. The seem to be flatter and have a curved tip which makes application near to the cuticle area so much easier than the standard brush. However whilst looking through my nail polish collection, I did notice not all polishes have this application brush. I have also noticed taking photo’s of nail art, that in normal light they appear opaque, but under the flash of the camera, they tend to be a little transparent, which has been a nightmare when writing new blog posts. Nowadays I make sure I definitely have two coats before taking pictures.  You can find these little pots of colours in most Boots stores
 
I don’t own too many of these polishes, just a handful. The ones I do have seem to okay, not brilliant by any means, but okay. They have quite a watery consistency and can be a little transparent, but if you don’t mind applying two-three coats, then they are nice polishes. I do like the shape of their bottles, they are easy to hold on application, although they only tend to stock the mainstream colours and have played it safe with a few naturals, reds, and pinks that make up the bulk of their collection.
 
The wish list:
 
Chanel – This is on there for obvious reason. The have been put on a pedestal by many; bloggers, fashionistas and celebrities to name a few. They tend to lead the nail polish battle which many nail companies try to dupe seasonal colours. They always have rave reviews, however they do tend to sell out very quickly, so you have to be fast, but if you don’t mind shelling out a high price-tag, I’m sure you wont be disappointed. I have never tried a Chanel polish, but hopefully I will do
 
Ciate - The packaging is super cute and girly, and from the website the colours look rich and creamy, and just has an ora about it that speaks out to me. A little birdie told me that they have recently changed the company that actually manufactures the nail polish. So those little people stuck in the lab of nail polish heaven are none other than the ones that create the polish for Chanel! So before I head to the Chanel counter at Harrods or Selfridges,. I shall be making my first pit-stop there
 
China Glaze - Now this brand is another sort after nail polish brand that I know is rather popular amongst bloggers. However I have not tried these so therefore can not really make an informed judgement. From what I have read on other blogs, YouTube videos and from their own website they seem to sell a variety of colours, that tend to be rather popular, so may have to add these to my wish list and make a purchase soon.
 
L.A. Girl - I recently discovered a hot pink matte shade that I really REALLY want.. However from the little bit of research I have done I can only seem to get it from across the pond in the US and they don’t ship internationallyL if any of you out there know how I can get my talons on a bottle, please let me know…
 
Essie - I have heard rave reviews on these polishes, and would like to give them a go. They seem to stock a good range of colours, and are not too steep in price either. Could be a close contender in my nail polish battle.
So, for me Nails Inc. win my battle, but they may not win the War. I wont know that answer until I have tried and tested every single brand. So my War may last years, but then again what War doesn’t?
 
Who wins your battle and why?
Until next time…
 
Laura-Jane