Saturday, 28 September 2013

Navy and gold textured Ruffian manicure

A few weeks ago the boyfriend surprised me with a couple of bottles of nail polish from the new OPI San Francisco collection. Among the bottles was the 'Wharf! Wharf! Wharf!' liquid sand polish I had really wanted, and I just couldn't wait to try it out. It is a lovely navy blue polish with a ton of iridescent flecks that shine and shimmer subtly in different lights and I just love it.
This manicure was born...
I have always been quite a fan of the Ruffian manicures seen on the runways a few years ago, and have been waiting for the perfect navy and gold combination in my collection to do so. So I have the lovely boyfriend to thank for that.
I prepped my nails with a layer of OPIs base coat, and then topped it off with Barry M's 'gold foil' polish, of course drying time was aided by a coat of Seche vite. To give it some extra sparkle I then topped the gold foil polish with Nails Inc 3D glitter polish 'Wembley', again Seche Vite came to the rescue.
Then it was time to create the Ruffian look. I used the application brush in the bottle to apply the liquid sand polish to the main body of the nail, and then touched it up and rounded the bottom using a nail art brush.
As 'Wharf! Wharf! Wharf! is a textured polish, there is no need to add a top coat, and I am pleased to say it dries really quickly. Once dried I can guarantee you, that you wont help but rub your fingertips over you nails.

I really love this manicure and I found myself constantly admiring it, I think the two polishes together really compliment each other and add a subtle bling factor to the manicure without being too overpowering.
What do you think? Are you a fan of Ruffian manicures? What's your favourite colour combination? Are you a lover or hater of textured polishes?
Until next time...
Laura-Jane
P.S. this manicure was so hard to remove, maybe it love my nails as I much as I loved it on my nails!

Sunday, 15 September 2013

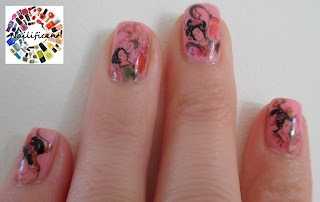
Geisha Girl Water Decal Nail Art

For today's nail art post, I tried something I haven't tried before: water decals. Why haven't I tried these before? I have no idea! I wish I could take credit for the beautiful detailed little designs, but I can't. I purchased them from a nail art company called Sparkly-Nails and I think I paid around £1.50 for the pack which contains 15 decals. So enough to do one full set of nails and a few spare in case of mishaps or accent nails.


I first prepped my nails using OPI's base coat, and applied three thin coats of Nails Inc's 'Warwick Avenue' to make the polish opaque and applied a coat of Seche Vite to speed up the drying process and allowed to dry.


I chose five different designs to apply to my nails. I made sure I used the same picture for the same finger for both hands, but I used mirroring images so they were not all facing the same direction, which was a nice touch. I made sure I cut extremely close to the image so that it would fit onto my nails.


I filled a small bowl with tepid tap water and started with thee pinky finger. I placed the decal in the water for around 30 seconds and removed using tweezers. the image should then slide very easily off the paper backing and allowed me to place on my nail in the desired spot. You have around 30 seconds before the decal dries in place so you don't have to be super quick.


I continued with this process until all ten nails had been completed and topped them all off with a coat of Seche Vite to seal the water decals in place and to give my manicure that extra shine.


I am really please with how they ruined out and how simply and easy they were to apply. I got lots of compliments from this manicure. I ordered a bunch of different decals and I can't wait to use them again. Although I have lots of planned nail art for future posts to get through first.


Have you used water decals before? Do you find them easy to apply too? I would love to see some of your designs, let me know what you think in the comments box below.
 
Until next time...
 
Laura-Jane

Sunday, 1 September 2013

Galaxy Nail art

Pinch, punch, first of the month...
 
SO, I finally jumped on the bandwagon and have created my own little universe on the tips of my fingers. I have always admired them from afar on other peoples blogs and YouTube channels and thought it was time I gave them a try. They are extremely easy to do, and they attract quite a few comments.


I first started by painting my nails black (with the exception of my ring finger) with nails inc 'black taxi'. I painted my ring finger blue using a colour from my Frauline collection, which unfortunately doesn't have a name. I of course topped them all off with a coat of Seche Vite and allowed to dry.


I decided to create a different design on each of my fingers.
 
The pinky:


I used a make-up sponge to dab a large blue area diagonally across my nail, and filled it in by sponging yellow, white and silver glitter polish to create a milky way design. I used polishes from my Frauline collection, and yep, you guessed it. They don't have names. Sorry.
 
The ring finger:


I painted a large opal circle in the corner of my ring finger to represent the moon in a night sky. I chose an opal colour, as the moon isn't exactly white, and it saved me time conturing it with grey polish. I created little star like crosses using white polish and a toothpick and added a few small stars in the form of white and glitter polish dots.
 
The middle finger:


Again using a sponge I dabbed on two different colour blues and a mauve colour, which again was from my no-name Frauline polish collection. I placed a few specks of craft glitter and dabbed on lots of silver glitter polish to create the galaxy nail.
 
Index/pointer finger:


I created a ombre effect using a sponge, two different colour blues and a white polish for the tips. I am really pleased with how the gradient came out. I used craft glitter to represent some stars.
 
The thumb:


I used the same technique as my middle finger, but instead of using craft glitter pieces, I painted on some ross shaped stars and tiny spots.


I of course allowed my nails to dry and topped it off with another coat of SV to make them extra sparkly.


I quite like they way this manicure turned out, especially as I normally have my nails more uniform. I think the ring finger and index finger tie the manicure together and also makes the blue polish pop on the other nails. I shall definitely be trying different designs on individual fingers in the future.


If you have a galaxy manicure that you'd like to share, let me know in the comments box. I would love to have a look at them.
 
What do you think? Which nail is your favourite?
 
Until next time...
 
Laura-Jane